Enhancing Classroom Communication Through Slack

A few months ago, I posted about Slack, and some ideas for how it could be used in the classroom. In the article, I mentioned that JHU Professor Jennifer Bernstein regularly uses Slack to communicate with students in her classes. Since that time, we followed up with Professor Bernstein to find out more about her experience.

The following is a guest post by Jennifer Bernstein, Lecturer, Center for Leadership Education, Whiting School of Engineering, Johns Hopkins University.

The culture of the medical profession is continually evolving; issues ranging from the cost of health care to demographic changes are just some of the factors influencing the culture surrounding medical professionals in the United States. As an instructor in this field, it is imperative to keep things as current for students as possible. In my class, Culture of the Medical Profession, I am constantly integrating new content from the news, twitter feeds, Instagram, and other sources. When newsworthy items arise, which is multiple times per week, I need to be able to notify students about these developments quickly and efficiently. I also want to spark conversation among the students about these developments as they happen. In Blackboard, where much of my course content resides, the synchronous communication tools available do not offer me an effective solution to keeping students informed and up-to-date; I find posting new content in Blackboard cumbersome and time-consuming, and the chat areas offer little interest when compared with commonly used platforms like Twitter.

Most of the students in my Culture of the Medical Profession class are in the pre-professional program and are planning to go on to medical school, dental school, or some other clinical training program. One of the course goals is for students to explore challenges faced by health professionals on a daily basis and why they are relevant for students considering a life in medicine; following the ongoing conversations about these challenges provides students with an awareness of what issues they may face once they commit to the field. Another goal is to provide students with a platform to communicate their own thoughts and ideas about these issues with me and with each other. In addition to the benefits of being exposed to various perspectives on each of the issues, this exercise helps students learn to clearly convey their ideas and findings to various professional audiences. I need a tool that will accommodate both of these goals: a way to immediately share relevant current events and enable students to effectively communicate about them.

About three years ago, I discovered Slack, an online communication tool used for project management and information sharing. I was on a joint JHU-MIT research team that was using it and soon came to realize how easy it was to synchronously and asynchronously communicate and share resources with other members of the group. In particular, we had fun sharing relevant news items, commenting on those items, or leaving emojis when we were short on time. Slack seemed like a natural fit for my class so I decided to give it a try.

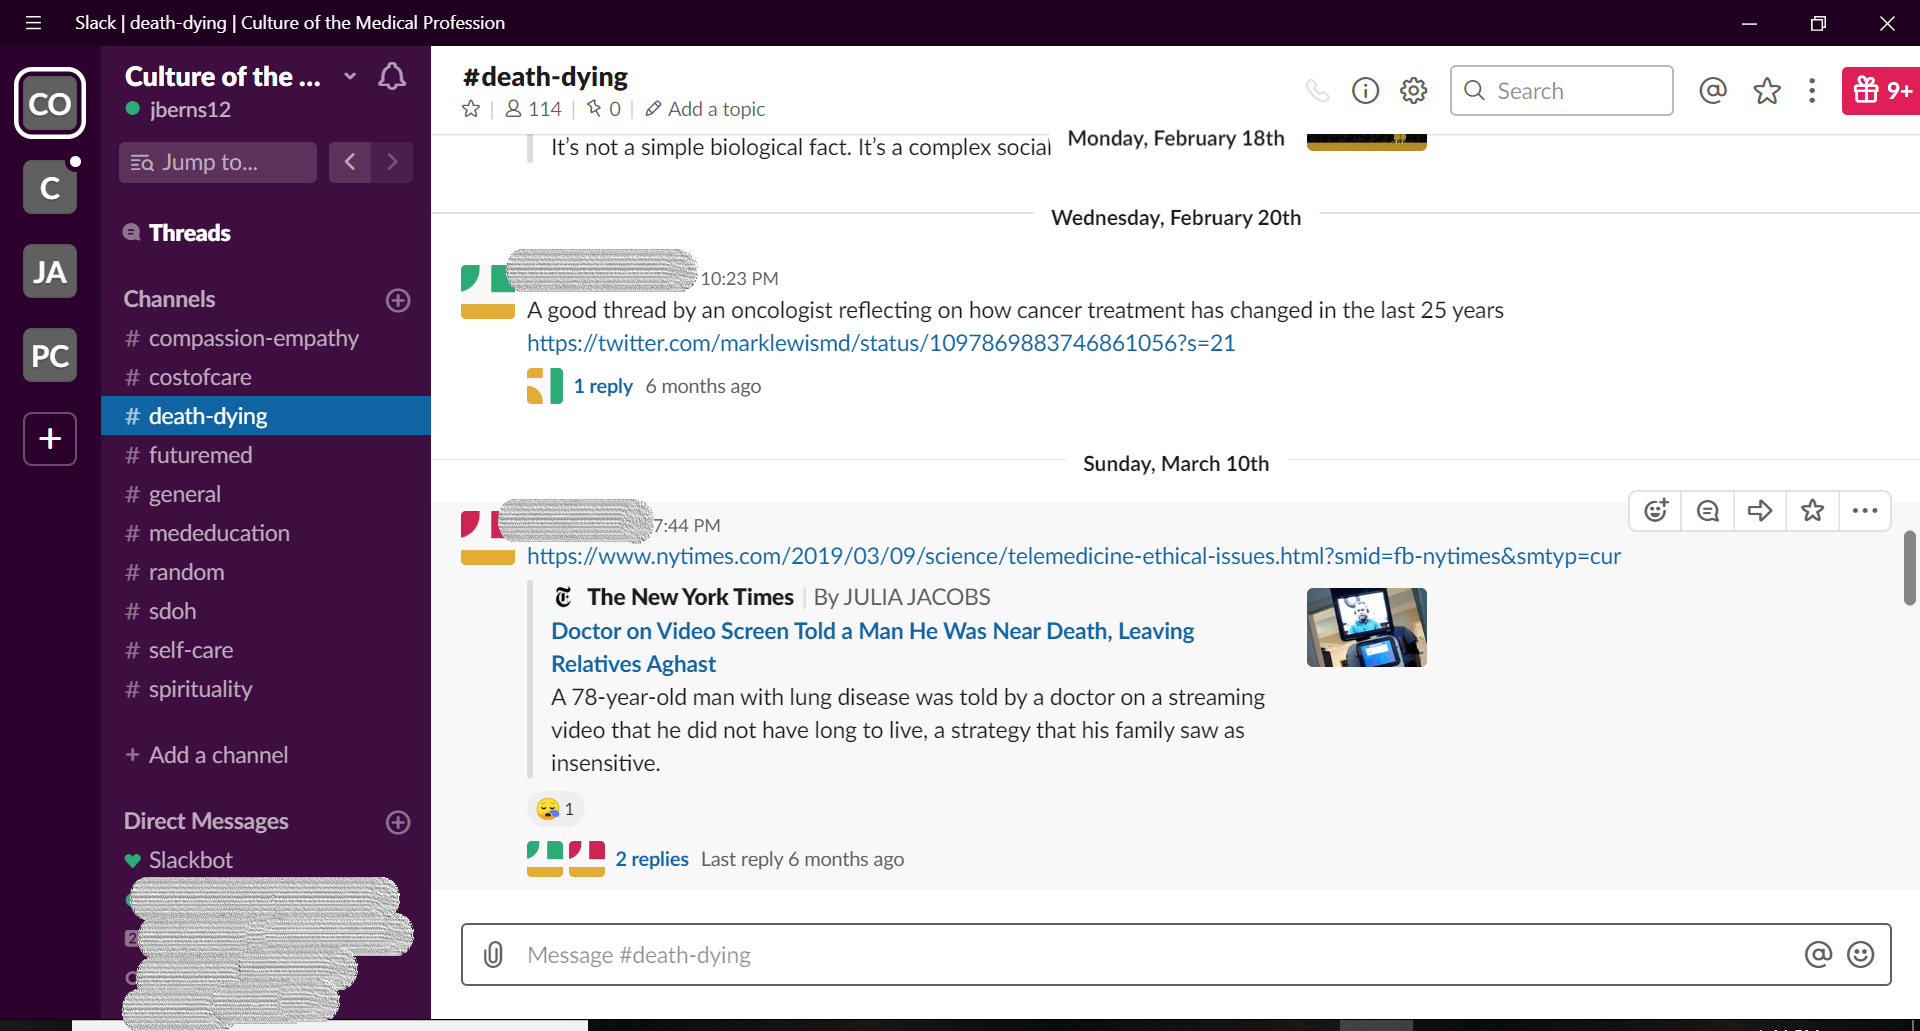
I created a workspace in Slack for my class, which was separate from my research workspace. Slack workspaces are organized into ‘channels’ which are similar to chat rooms dedicated to specific topics. In my case, I created a channel for each topic on my syllabus. The names of channels are preceded by hash tags (e.g., #mededucation, #costsofcare, etc.). Once the Slack space was set up, I walked students through the mechanics of using it. Many of them had used it before and/or currently had their own accounts because they work in research labs and other academic environments that commonly utilize Slack, so they caught on quickly.

I let students know at the beginning of the term that their participation in Slack would count towards their overall participation grade. Two to three times each week I posted articles, tweets, etc. and provided brief commentary on the relevance. I posted not only in whatever channel/topic we were currently studying but also across the other hashtags. Students almost immediately responded with their own articles, reactions, links, etc. Sometimes the online discussions were so lively that they continued into our next face-to-face class meeting. Students also realized they could have conversations with individuals, separate from the group, so there were often several side conversations going on at the same time.

Since using Slack, the level of engagement in online class discussions has been consistently high. Students post to channels on their own, unprompted. Many of the issues covered in class are controversial and not always easy to talk about face to face. Slack provides a safe space to discuss and consider various perspectives of these issues; I’ve noticed that it also gives the quieter students an outlet to participate more confidently.

Community building has also been enhanced by using Slack. In general, I structure my classes so that about half of the time is lecture-based and the other half is some sort of group activity. Because of their frequent interactions on Slack, students now get to know one another beyond the small groups they are assigned to during class. Out of class, they slack each other relevant articles, links, etc. pertaining to whatever project they’re working on.

Feedback from previous students about Slack has been very positive; because of the continuous, up-to-date exposure to various issues in the medical field and the opportunity to communicate about them, students report feeling much more confident and prepared for medical school interviews. According to students, interviewers have been very impressed with their knowledge, passion, and level of commitment.

A few of my previous students, now currently in their gap year or training, continue to participate in the course’s Slack space because they want to keep up with current issues. This has been extremely beneficial to myself and my current students.  As an instructor, it allows me to check in with them to see if there are any changes I should consider making to the course. For current students, it’s a connection to someone in the field, with an authentic perspective.

On the administrative side of things, Slack has definitely saved me time and frustration. It’s a snap to add/update links and notify students of any changes. There are also features that allow instructors to track student participation, if desired. Instructors can opt-in to an automatically generated weekly summary of usage statistics showing how many messages were posted, etc. There is also a powerful search feature in Slack which allows instructors to search and view posts made by individual students. If a discussion happens to get out of hand, instructors (as owners of a Slack space) have the ability to delete inappropriate posts and close it down if necessary.

Instructors have a range of options as they consider how to effectively communicate and share information with their students. Slack is working very well in my class of 19-25 students, but I recognize that it may not be the best tool for all classes. Instructors with large lecture classes, for example, might be challenged to use it effectively. Although I’m not there yet, I’m trying to figure out ways to use Slack in my other classes.  In the meantime, it challenges me to make sure students in Culture of the Medical Profession see the relevance of the class beyond just an academic exercise and realize its value in their life’s work and experiences.

Jennifer Bernstein, Lecturer
Center for Leadership Education, Johns Hopkins University

Jennifer Bernstein is a lecturer in the Center for Leadership Education and has 20 years of experience working on WHO-, industry-, U.S. government-funded research studies and clinical trials. She is an alum of the Johns Hopkins Bloomberg School of Public Health and teaches a number of courses including Culture of the Medical Profession and Technical Writing.

Image Source: Pixabay, Jennifer Bernstein

The New Google Sites

We’re always on the lookout for applications that instructors and their students can use to enhance course work. A previous post We Have a Solution for That: Student Presentations, Posters, and Websites (October 6, 2017) mentioned a new version of Google Sites as having potential as a presentation software that allows for easy collaboration among student team members. Today’s post will delve deeper into its possibilities and use. This post is also available in PDF format as part of The Innovative Instructor articles series.

Logo for Google SitesNew Google Sites is an online website creation platform. It doesn’t require web development or design experience to create sites that work well on mobile devices. The New Google Sites application is included with the creation tools offered in Google Drive, making it easier to share and integrate your Google Drive content.

In 2006 Google purchased JotSpot, a software company that had been creating social software for businesses. The software acquired from that purchase was used to create the first iteration of Google Sites, now known as Classic Google Sites. Ten years later, Google launched a completely rebuilt Google Sites, which is currently being referred to as New Google Sites.

New Google Sites hasn’t replaced Classic Google Sites so much as it offers a new and different experience. The focus of New Google Sites is to increase collaboration for all team members regardless of their web development experience. It is also integrated with Google Drive so that teams working within the Google apps environment can easily associate shared content.

This new iteration of Google Sites is designed with mobile devices in mind. Users are

Screenshot example of the New Google Sites editing interface.

Example of the New Google Sites editing interface.

not able to add special APIs (Application Programmable Interface, which extends functionality of an application) or edit HTML directly. This keeps the editing interface

and options simple to ensure that whatever you create will work consistently across all browsers and devices. While this may seem limiting, you still have the option to use Classic Google Sites if you want a higher level of control.

In a classroom setting, instructors are often cautious about assigning students projects that require them to learn new technical skills that aren’t directly relevant to the course content. Instructors must balance the time it will take students to achieve technical competency against the need to ensure that students achieve the course learning goals. With New Google Sites, students can focus on their content without being overwhelmed by the technology.

In addition to ease of use, collaborative features allow students to work in teams and share content. Group assignments can offer students a valuable learning experience by providing opportunities for inclusivity, exposure to diverse viewpoints, accountability through team roles, and improved project outcomes.

New Google Sites makes it easy for the causal user to disseminate new ideas, original research, and self-expression to a public audience. If the website isn’t ready to be open to the world, the site’s editor has the ability to keep it unpublished while still having the option to collaborate or share it with select people. This is an important feature as student work may not be ready for a public audience or there may be intellectual property rights issues that preclude public display.

Professors at here at Johns Hopkins have used New Google Sites for assignments. In the History of Science and Technology course, Man vs. Machine: Resistance to New Technology since the Industrial Revolution, Assistant Professor Joris Mercelis had students use New Google Sites for their final projects. Teams of two or three students were each asked to create a website to display an illustrated essay based on research they had conducted. Images and video were required to support their narrative arguments. Students had to provide proper citations for all materials. Mercelis wanted the students to focus on writing for a lay audience, an exercise that encouraged them to think broadly about the topics they were studying.

History of Art Professor Stephen Campbell used a single Google Site where student teams collaborated to produce an online exhibition, Exhibiting the Renaissance Nude: The Body Exposed. Each student group was responsible for supplying the materials for one of five topic pages. The content developed from this project was accessible only to the class.

In both cases, students reported needing very little assistance when editing their sites. Typically, giving an introductory demonstration and providing resources for where to find help are all students need to begin working.

Recently, Google has created the ability to allow other Google Drive content to be embedded in a site. This means that you can embed a form or a document on a web page to elicit responses/feedback from your audience without them having to leave the site. This level of integration further supports the collaborative nature of Google applications.

Currently, this iteration of Google Sites uses the New in its title. There may come a time when Google will drop the New or re-brand New Google Sites with a different name. There is no indication that Google will stop supporting Classic Google Sites with its more advanced features.

Use of both versions of Google Sites is free and accessible using your Google Account. You can create a new site by signing into Google and going to the New Google Sites page (link provided below). You can also create a site from Google Drive’s “New” button in the creation tools menu.

It is recommended that students create a new account for class work instead of us­ing their personal accounts. While this is an additional step, it ensures that they can keep their personal lives separated from their studies.

A Google Site as displayed on a desktop, tablet, and smartphone.

A Google Site as displayed on a desktop, tablet, and smartphone.

Additional Resources:

Reid Sczerba, Multimedia Developer
Center for Educational Resources

Image sources: Google Sites logo, screenshots

We Have an App for That! SketchUp

SketchUp logo.SketchUp is a three-dimensional rendering application that uses a sketch-based approach for creating models. It may be beneficial to anyone looking to visualize three Screen shot showing the range of items (people, landscaping, buildings, monuments, vehicles, appliances, furnishings) that can be drawn with SketchUp.dimensional structures, spaces, or objects. With a free-to-use version available for download, SketchUp is an affordable way to develop 3D models. It is easy to learn compared to professional 3D graphic software packages.

The application was created in 2000 by @Last Software. Google purchased SketchUp in 2006. Under Google’s ownership, the program was developed further and integrated with Google Earth to allow importing models for geo-location. In 2012, Google sold SketchUp to Trimble Inc., a mapping, navigation, and surveying equipment company. Trimble continues to develop the application and support SketchUp’s growing community of users.

Three-dimensional rendering software is typically complex and requires a significant time investment to learn and use. SketchUp was developed to be intuitive and easy to learn with the intent to bring “3D modeling to the masses.” It was used early on by architectural firms to provide quick concept renderings of buildings and environments. Today, the application is used by interior designers, landscape architects, civil and mechanical engineers, and film and video game creators. There are use cases for the program ranging from exploring building structures, conceptualizing mechanical objects, teaching complex structures, and remodeling houses.

Using your imagination to conceptualize physical spaces is difficult. CommunicatingSketchUp drawing showing a building in ground elevation. ideas and concepts that involve spatial and volumetric relationships in space, such as comparison of size and distance between objects, is often more effectively accomplished by sharing visualizations and renderings of the subject. This allows viewers to have a common point of reference in which to talk about details.

Three-dimensional models offer immersive and engaging aspects that are potentially exciting to viewers. For example, sharing a virtual walkthrough of an ancient city or a 360-degree view of a design prototype can make the experience memorable for your students, which helps them retain the information presented.

Creating three-dimensional models for pedagogical purposes has traditionally required the use of expensive professional modeling applications and highly skilled staff. SketchUp’s free modeling tools make the process of creating models an intuitive experience. This can be a great starting point for faculty to produce three-dimensional models and environments. Moreover, your students may not have developed the ability to think spatially. Assigning a course project that involves the use of SketchUp creates an opportunity for learning these skills.

Screenshot of SketchUp building plan showing extensions and repositories.SketchUp provides accurate tools for the rendering of objects and spaces. As an easy entry point for CAD (Computer Aided Design) software, SketchUp can be used in disciplines that require technical drawings and diagrams. For example, SketchUp can be used to conceptualize urban planning initiatives to think through the impact of proposed changes to a community. Resulting models can be shared with stakeholders complete with walkthrough animations and annotations to provide additional information.

Drawing of a verge and folio mechanism created in SketchUp by Reid Sczerba.

Example diagram of verge and folio mechanism created in SketchUp.

SketchUp can be particularly useful for design projects in engineering disciplines that require the development of prototypes, such as a design project to develop a radio transmitter and receiver within a size specification that could withstand an impact of 100 pounds of force. Team-members could use SketchUp to map out the circuitry for the electrical components and develop the housing. There are methods to use a SketchUp model to create a physical prototype with a 3D printer.

At Hopkins, Bill Leslie, a professor of History of Science and Technology, had in the past required students to build a shoebox diorama of a museum exhibition featuring a topic of their choice. After discovering SketchUp, he offered students the option to create their exhibition space in 3D. The students were unanimous in choosing SketchUp, which improved both the consistency of the projects and the logistics of presenting them to class. Students demonstrated creativity and engagement in the project.

Interest in virtual and augmented reality has increased in recent years. Companies have developed new technologies and methods to offer opportunities for people to experience virtual environments. Universities have been investigating technologies such as Google Cardboard, Oculus Rift, and Microsoft HoloLens. Currently, there is a lack of content available to make use of these emerging technologies. SketchUp could find itself in a position to be a starting point for the creation of 3D spaces that can be experienced in a highly immersive environment.

Trimble offers a free version of the application called SketchUp Make. It includes all of the basic features for modeling. SketchUp Pro is a full featured version that includes features such as solid modeling tools, importing terrain and satellite imagery, dynamic components, and importing and exporting file formats necessary for use in other applications. If you are an educator and plan on teaching with SketchUp, you can request a free one-year license to use the full-featured SketchUp Pro. Students are also able to get a discount on a one-year license with proof of enrollment.

There are video tutorials available for learning SketchUp. These tutorials are often the most efficient way to learn the application and get a quick start on a project.

One of the best resources from the SketchUp community is the 3D Warehouse, an online repository for sharing user-generated models. The models found in the 3D Warehouse can be a starting point for your own projects. There are a number of companies that have uploaded professionally created models of their products so if you are looking for a specific model of say, a household appliance, you may find it there.

SketchUp is highly extendable, giving users the ability to develop plugins with the Ruby programming language. The Extension Warehouse is a repository of plugins you may install in your instance of SketchUp. Not all plugins are free, but if you need to have a photo-realistic polish or find a way to streamline a modeling process, the Extension Warehouse may have the answer.

Additional Resources

This post originally appeared as part of our Innovative Instructor print series in the Technology forum as SketchUp.

Reid Sczerba, Multimedia Development Specialist
Center for Educational Resources

Images sources: Logo and screenshots from SketchUp.com, Verge and Folio digram CC Reid Sczerba.

Padlet – A Web and Mobile App with Possibilities

One of my favorite activities as an instructional designer is seeking out and experimenting with new applications. Some of these are web-based and work best on laptops or desktops, others are designed for mobile devices, some are platform specific (Mac, Windows, Android, iOS) and some work well regardless of your hardware and software. Finding apps that have potential for classroom use is always rewarding, especially if the app is free and easy to use. Enter Padlet, a web-based application that gives you a “wall” (think of it as a multimedia bulletin board) that you can drag and drop content onto in service of any number of pedagogical objectives.

Example of a Padlet Wall: photo exhibit of cemetery.A Padlet wall can be adapted for many uses. The first thought I had was to create an exhibit using photographs I had taken at a cemetery in Asheville, North Carolina that had been originally used for slave burials. It was easy to drag images and a text document onto the wall (which can be customized using a number of different backgrounds), and to use the built-in text boxes for annotation.  Audio and video clips can also be inserted, as well links to web materials. In less than 10 minutes, I had a photo exhibition. I’ve recommended other applications for faculty who want students to create online exhibits including Google Sites, WordPress, and Omeka. These offer more features and flexibility, but for being easy to use, Padlet takes the prize.

Other uses include creating timelines, assembling evidence to support an argument, building a visual data set (the world map background might be particularly useful for such an exercise), or to create an online poster presentation. See the Padlet gallery for more ideas.

Padlet’s website lists the application’s features. It can be used as a collaborative tool with team members’ additions appearing instantaneously, making it great for groups that aren’t co-located. The privacy settings are flexible. I set my wall to public so that you could see it, but it’s also possible to keep it completely private or to give others access and set permissions as to their use. Moreover, it works on your laptop, desktop, phone, or tablet.

Take a few minutes and check out Padlet. How would you use it as an instructor?

Macie Hall, Senior Instructional Designer
Center for Educational Resources


Image Source: Screenshot of Padlet Wall by Macie Hall