Empowering Students through Guided Reflection

[Guest post by Pamela Sheff, Director, Center for Leadership Education, Johns Hopkins University]

lighthouseEach spring, I teach a course called Culture of the Engineering Profession for the Center for Leadership Education in the Whiting School. Primarily through discussions and projects, students in this class investigate what it means to be an engineer, identify contemporary issues in engineering, and consider the ethical guidelines of the engineering profession. The majority of students in the Spring 2019 class were Chemical and Biomolecular Engineering majors with a Mechanical Engineering student mixed in. This semester, I decided to experiment somewhat with guided reflection, a metacognitive practice that was new for many of these students.

One of the goals of the course is to help students strengthen their communication skills; therefore I leverage a great deal of class discussion including a requirement for students to lead a discussion at least once during the semester. Several times during the semester, I guided the students in reflecting not only on the quality of their discussions, but also on the culture of the classroom as a whole. I raised questions such as the following: What is working well? What could be changed? What values do students want in the classroom? From this reflective exercise the students generated a rubric listing characteristics including accountability, respect, and transparency. Every couple of weeks, I asked them to reflect on how they were doing as a group by reviewing the list.

After about six weeks, I noticed the group coming to consensus on what they felt was working in our classroom practice and what needed to change.  For example, one idea suggested by the group was to speak purposefully during discussions.  Students should not talk simply to be heard, but to move the discussion forward. Results included higher quality discussions and improved leadership skills.

The success of using a rubric to guide class discussions led me to continue using reflection to help students evaluate their major projects.  We talked during class about effective project criteria, for example, and what they should look for in the posters they would see at the course-wide poster fair.  The teaching assistants in the class then compiled the list of suggestions, which helped the students create strong written critiques after the fair. I talked with the class about how to assign grades to the team discussions they had been leading. Again, we worked in class to develop a list of criteria to consider and, the TAs and I developed the grading rubric. I then gave the students an opportunity to comment on the rubric before it was finalized. I also made the decision to allow students to grade their own projects according to the rubric. If I agreed with the grade they chose, the grade stood.  If not, I modified the grade. In a class of 29 students, I only had to lower two grades.  I did raise three grades, in cases where the students were unduly critical of their efforts.

The results of continuous guided reflection? The projects were the best I have ever seen in this class, and I could not have been more pleased. I attribute the high quality of work to students taking ownership of the process. It pushed them to live up to the standards they defined for themselves, and in many cases, go beyond them.  Providing space for students to reflect on what they were working towards led them to act more purposefully and, in turn, allowed me to give them agency over the classroom. I am thrilled with the way this approach worked out and am planning to use it again in future semesters.

Pamela Sheff, Associate Teaching Professor and Director
Center for Leadership Education, Johns Hopkins University

Pamela Sheff is an award-winning writer and marketing communications consultant, with a wealth of experience developing marketing, public relations and communications strategies for clients ranging from start-ups to large corporate, institutional and government organizations. Now a full-time lecturer in the Center for Leadership Education, Pam has taught business communications for private companies and directed the Writing Program at Goucher College.

Image Source: Pixabay

Grading in the fast lane with Gradescope

[Guest post by Scott Smith, Professor, Computer Science, Johns Hopkins University]

Three speedometers for quality, grades per hour, and efficiency.Grading can be one of the most time consuming and tedious aspects of teaching a course, but it’s important to give prompt and meaningful feedback to your students. In large courses, aligning grading practices across multiple teaching assistants (TAs) necessitates a level of coordination that includes scheduling grading meetings, reviewing materials for correct answers, and calibrating point evaluations, all of which can take up valuable time during the semester.

In courses that teach programming, we typically assign students projects that require them to write programs to solve problems. When instructors grade this type of assignment, they not only have to observe the program’s results but also the student’s approach. If the results are not correct or the program doesn’t run, we have to spend time reviewing hundreds of lines of code to debug the program to give thoughtful feedback.

In the past, my method for grading assignments with my TAs may have been arduous but it worked. However, last year, no TAs were assigned to my Principles of Programming Languages course. Concerned that I wouldn’t have enough time to do all the work, I looked for another solution.

Consistent grading and providing meaningful feedback for student’s every submission, especially with multiple teaching assistants (TAs) can be challenging. Typically, when grading, I would schedule a time to sit down with all of my TAs, review the assignment or exam, give each TA a set of questions to grade, pass the submissions around until all were graded, and finally calculate the grades. When a TA had a question, we could address it as a group and make the related adjustments throughout the submissions as needed. While this system worked, it was tedious and time consuming. Occasionally, inconsistencies in the grades came up, which could prompt regrade requests from students. I kept thinking that there had to be a better way.

About year and a half ago, a colleague introduced me to an application called Gradescope to manage the grading of assignments and exams. I spent a relatively short amount of time getting familiar with the application and used it in a course in the fall of 2016, for both student-submitted homework assignments and in-class paper exams. In the case of the homework, students would upload a digital version of the assignment to Gradescope. The application would then prompt the student to designate the areas in the document where their answers can be found so that the application could sort and organize the submissions for the ease of grading. For the in-class exams, I would have the students work on a paper-based exam that I set up in Gradescope with the question areas established. I then would scan and upload the exams so that Gradescope could associate the established question areas to the student submissions automatically. The process of digitizing the completed tests and correlating them to the class roster was made easy with a scanner and Gradescope’s automatic roster matching feature. Gradescope became a centralized location where my TAs and I could grade student work.

There are a few ways to consider incorporating Gradescope into your course. Here is a non-exhaustive list of scenarios for both assignments and exams that can be accommodated:

  • Handwritten/drawn homework (students scan them and upload the images/PDFs)
  • Electronic written homework (students upload PDFs)
  • In-class exams (instructor scans them and uploads the PDFs)
  • Coding scripts for programming assignment (students upload their program’s files for auto-grading)
  • Code assignments graded by hand (students upload PDFs of code)

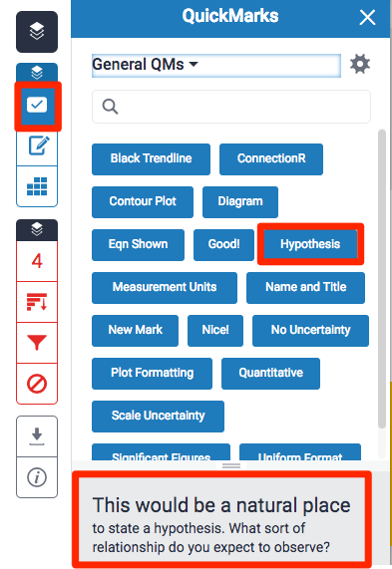
The real power of Gradescope is that it requires setting up a reusable rubric (a list of competencies or qualities used to assess correct answers) to grade each question. When grading, you select from or add to the rubric to add or deduct points. This keeps the grading consistent across multiple submissions. As the rubric is established as a part of the assignment, you can also update the point values at any time if you later determine that a larger point addition/deduction is advisable, and the grade calculations will update automatically.

Screenshot from Gradescope--Review grade for assignment feature.

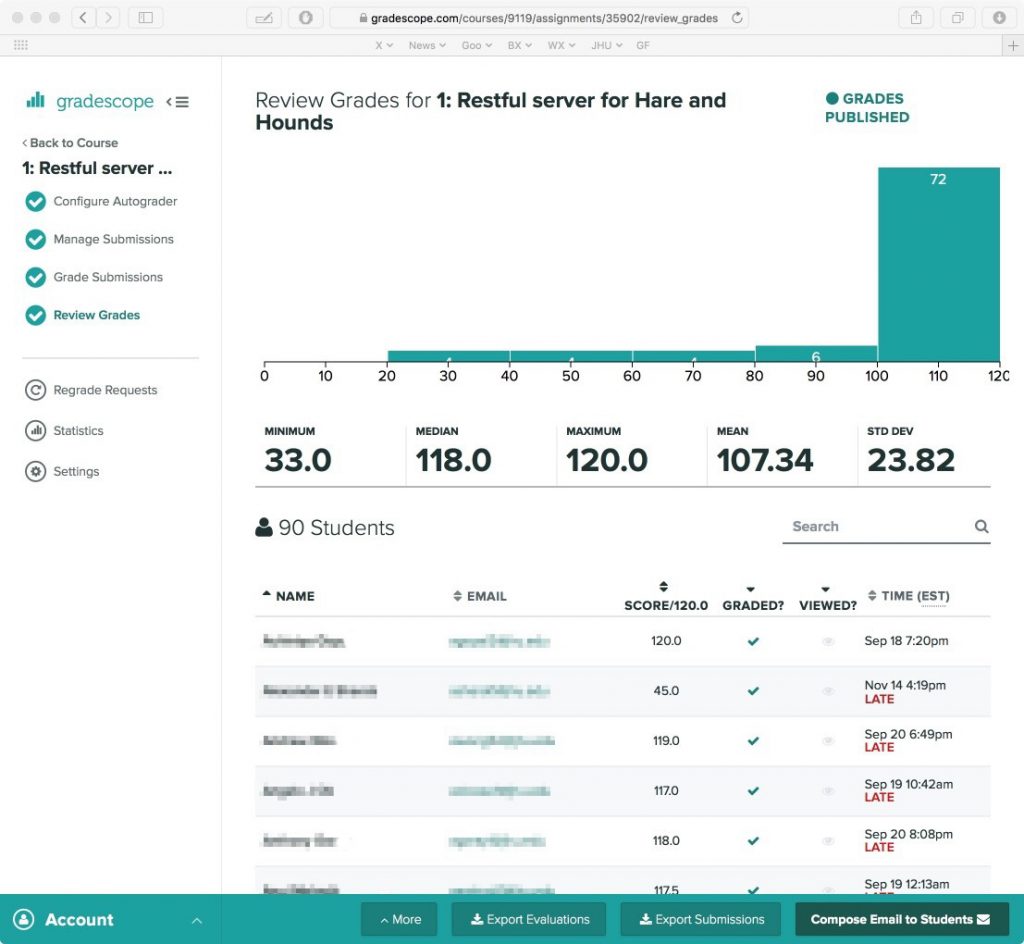
Screenshot of Gradescope’s Review Grade for an assignment

After being informed that I wouldn’t have any TAs for my Principles of Programming Languages course the following semester, I was motivated to use one of Gradescope’s [features, the programming assignment auto-grader platform. Being able to automatically provide grades and feedback for students’ submitted code has long been a dream of instructors who teach programming. Gradescope offers a language-agnostic environment in which the instructor sets up the components and libraries needed for the students’ programs to run. The instructor establishes a grading script that is the basis for the analysis, providing grades and feedback for issues found in each student’s submitted program.

Overall, the use of Gradescope has reduced time spent grading and improves the quality of feedback that I am able to provide students. For instance, when I release grades to the students, they are able to review each of the descriptive rubrics that were used when grading their submissions, as well as any additional comments. Auto-grader was really the star feature in this case. Students were able to submit their code, determine if it would run, and make corrections before the deadline to increase their chances of a better grade. There are features to reduce the number of allowed submissions, but I choose not to set a limit so that the students could use an iterative approach to getting the right solution.

Gradescope is only effective if your rubrics and grading criteria are well thought out, and the auto-grading scripts require some time to set up.  Creating the grading scripts for the programming assignments may seem time intensive, but by frontloading the work with detailed rubrics and test cases, more time is saved in the grading process. The value of this preparation scales as enrollment increases, and the rubrics and scripts can be reused when you teach the course again. With more time during the semester freed up by streamlining the grading process, my TAs and I were able to increase office hours, which is more beneficial in the long run for the students.

Screenshot showing student's submission with rubric items used in grading.

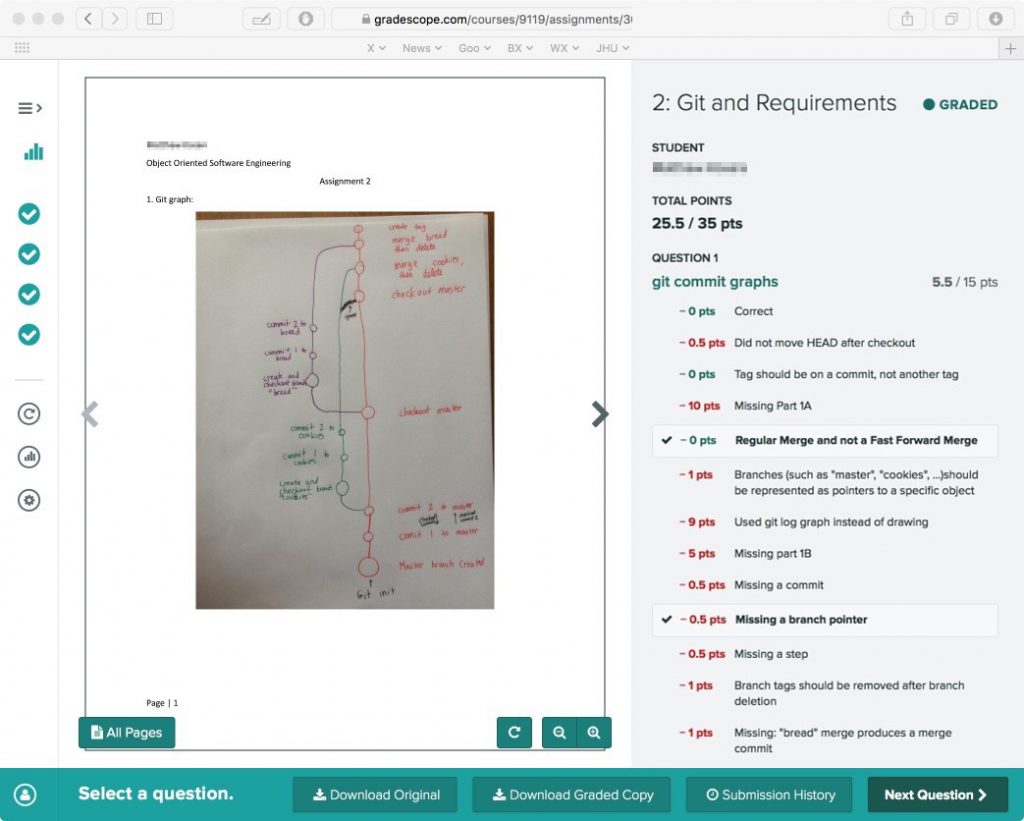
Student’s submission with rubric items used in grading

The process for regrading is much easier for both students and instructors. Before Gradescope, a regrade request meant determining which TA graded that question, discussing the request with them, and then potentially adjusting the grade. With the regrade feature, students submit a regrade request, which gets routed to that question’s grader (me or the TA) with comments for the grader to consider. The grader can then award the regrade points directly to the student’s assignment. As the instructor, I can see all regrade requests, and can override if necessary, which helps to reduce the bureaucracy and logistics involved with manual regrading. Additionally, regrade requests and Gradescope’s assignment statistics feature may allow you to pinpoint issues with a particular question or how well students have understood a topic.

I have found that when preparing assignments with Gradescope, I am more willing to create multiple mini-assignments. With large courses, the tendency would be to create fewer assignments that are larger in scope to lessen the amount of grading. When there are too few submission points for students who are deadline oriented, I find that they wait till the last few days to start the assignment, which can make the learning process less effective. By adding more assignments, I can scaffold the learning to incrementally build on topics taught in class.

After using Gradescope for a year, I realized that it could be used to detect cheating. Gradescope allows you to see submissions to specific questions in sequence, making it easy to spot submissions that are identical, a red-flag for copied answers. While not a feature, it is an undocumented bonus. It should also be noted that Gradescope adheres to FERPA (Family Educational Rights and Privacy Act) standards for educational tools.

Additional Resources:

  • Gradescope website: https://gradescope.com
  • NOTE TO JHU READERS ONLY: The institutional version of Gradescope is currently available to JHU faculty users through a pilot program. If you are faculty at Johns Hopkins University’s Homewood campus interested in learning more about how Gradescope might work for your courses, contact Reid Sczerba in the Center for Educational Resources at rsczerb1@jhu.edu.


Scott Smith, Professor
Department of Computer Science, Johns Hopkins University

Scott Smith has been a professor of Computer Science at Hopkins for almost 30 years. His research specialty is programming languages. For the past several years, he has taught two main courses, Software Engineering, a 100 student project-based class, and Principles of Programming Languages, a mathematically-oriented course with both written and small programming assignments.

Images Sources: CC Reid Sczerba, Gradescope screenshots courtesy Scott Smith

Lunch and Learn: Creating Rubrics and Calibrating Multiple Graders

Logo for Lunch and Learn program showing the words Lunch and Learn in orange with a fork above and a pen below the lettering. Faculty Conversations on Teaching at the bottom.On Friday, December 15, the Center for Educational Resources (CER) hosted the second Lunch and Learn—Faculty Conversations on Teaching—for the 2017-2018 academic year.  Laura Foster, Academic Advisor, Public Health Studies, and Reid Mumford, Instructional Resource Advisor, Physics & Astronomy, presented on Creating Rubrics and Calibrating Multiple Graders.

Laura Foster led by giving us a demonstration of her use of Blackboard for creating rubrics. She noted that she might be “preaching to the choir” but hoped that those present might take back these best practices to their colleagues. Noting that many faculty have negative opinions of Blackboard, she put in a plug for its organizational benefits and facilitation of communication with students.

Foster started using Blackboard tools for a Public Health Studies class where she was grading student reflections. The subject matter—public health studies in the media—was outside of her field of physical chemistry. Blackboard facilitates creating a rubric that students can see when doing an assignment and the instructor then uses to grade that work. She showed the rubric detail that students see in Blackboard, and how the rubric can be used in grading. [See the CER Tutorial on Blackboard Rubrics and Rubrics-Helpful Hints] The rubric gives the students direction and assures that the instructor (or other graders) will apply the same standards across all student work.

It empowers students when they know exactly what criteria will be used in evaluating their work and how many points will be assigned to each component. Foster has found that using rubrics is an effective way to communicate assignment requirements to students, and that it helps her to clarify for herself what at the most important points. She noted that a rubric is very useful when there are multiple graders, such as Teaching Assistants (TAs), as it helps to calibrate the grading.

In response to questions from the audience, Foster stated that rubrics can be developed to cover both qualitative and quantitative elements. Developing good rubrics is an iterative process; it took her some time to sharpen her skills. There is flexibility in differentiating points allotted, but the instructor must be thoughtful, plan for a desired outcome, and communicate clearly. The rubric tool can be used to grade PDF files as well as Word documents. Foster noted that it is important to take opportunities to teach students to learn to write, learn to use technology, learn to read instructions, and learn to look at feedback given on assignments. Being transparent and explaining why you are using a particular technology will go a long way.

Reid Mumford gave his presentation on how he calibrates multiple graders (see slides). Mumford oversees the General Physics lab courses. This is a two semester, required sequence, so not all students are excited to be there. The sequences are on Mechanics and Electricity and Magnetism; both labs are taught every semester with multiple sections for each course. Approximately 600 to 700 students are taking these lab sequences each semester; students are divided into sections of about 24 students. The labs are open-ended and flexible, so students aren’t filling in blanks and checking boxes, which would be easier to grade. Lab sections are taught and graded by graduate student TAs, with about 30 TAs teaching each semester. Teaching and grading styles vary among these TAs as would be expected. Clearly, calibrating their grading is a challenge.

Grades are based on the best 9 of 10 lab activities, which consist of a pre-lab quiz and a lab note. All activities are graded using the same rubric. The grading scale used can be seen in the slides. One of the criteria for grading is “style,” which allows some flexibility and qualitative assessment. Students have access to the rubric, which is also shown in the slides.

About three years ago, Mumford adopted Turnitin (TII), the plagiarism detection tool, for Screen shot of Quick Mark grading tool.its efficient grading tools. It works well for his use because it is integrated with Blackboard. TII does its job in detecting cheating (and Mumford noted that lots of students are cheating), but it is the grading tools that are really important for the TAs. TAs are encouraged to be demanding in their grading and leave a lot of feedback, so grading takes them two to four hours each week. TII’s Feedback Studio (formerly known as GradeMark) allows TAs to accomplish their mission. [See CER tutorial on Feedback Studio and The Innovative Instructor post on GradeMark.] It was the QuickMark feature that sold Mumford on Feedback Studio and TII grading. Using the rubric for each activity, QuickMark can be pre-populated with commonly-used comments, which can then be dragged and dropped onto the student’s submitted work.

Graph showing General Physics Laboratory Section Grading Trends.These tools helped make the grading load more efficient, but calibrating the multiple graders was another challenge. Mumford found that the TAs need lots of feedback on their grading. Each week he downloads all the grades from Blackboard grade centers. He creates a plot that shows the average score for the weekly lab assignment. Outliers to the average scores are identified and these TAs are counseled so that their grading can be brought into line. Mumford also looks at section grading trends and can see which sections are being graded more leniently or harshly than average. He works with those TAs to standardize their grading.

In calculating final grades for the course, Mumford keeps three points in mind: final letter grades must be calculated, there should be no “easy” or “hard” sections of lab, and distribution should not vary (significantly) between sections. He makes use of per-section mapping and uses average and standard deviation to map results to a final letter grade model. Mumford noted that students are made aware, repeatedly, of the model being used. He is very transparent—everything is explained in the syllabus and reiterated weekly in lab sessions.

In conclusion, Mumford offered these take-aways:

  • Calibrating Multiple Graders is not easy
  • Tools are needed to handle multiple sections efficiently
  • Rubrics help but do not solve the calibration problem
  • Regular feedback to graders is essential
  • Limit of the system: student standing is ambiguous

In the future Mumford plans to give students a better understanding of course standing, to calculate a per-section curve each week, and to overcome some technical issues and the greater time investment that will be required with weekly calibrating and rescaling.

Macie Hall, Senior Instructional Designer
Center for Educational Resources

Image Sources: Lunch and Learn Logo, slides from Mumford presentation

Facilitating and Evaluating Student Writing

Over the summer I worked on revising a manual for teaching assistants that we hand out each year at our annual TA Orientation. One of the sections deals with writing intensive courses across disciplines and how TAs can facilitate and evaluate writing assignments. The information, advice, and resources in the manual speak to an audience beyond graduate student teaching assistants. Even seasoned instructors may struggle with teaching writing skills and evaluating written assignments.

View from above and to the right of a woman's hands at a desk writing in a journal next to a lap top computer.Two mistakes that teachers may make are assuming that students in their courses know how to write a scholarly paper and not providing appropriate directions for assignments. These assumptions are likely to guarantee that the resulting student writing will disappoint.

As a quick aside, faculty often complain about the poor quality of student writing, claiming that students today don’t write as well as students in some vaguely imagined past, perhaps when the faculty member was a college freshman. However, the results of an interesting longitudinal study suggest otherwise. A report in JSTOR Daily, Student Writing in the Digital Age by Anne Trubek (October 19, 2016), summarizes the findings of the  2006 study by Andrea A. Lunsford and Karen J. Lunsford, Mistakes Are a Fact of Life: A National Comparative Study. “Lunsford and Lunsford, decided, in reaction to government studies worrying that students’ literacy levels were declining, to crunch the numbers and determine if students were making more errors in the digital age.” Their conclusion? “College students are making mistakes, of course, and they have much to learn about writing. But they are not making more mistakes than did their parents, grandparents, and great-grandparents.” Regardless of your take on the writing of current students, it is worth giving thoughtful consideration to your part in improving your students’ writing.

Good writing comes as a result of practice and it is the role of the instructor to facilitate that practice. Students may arrive at university knowing how to compose a decent five-paragraph essay, but no one has taught them how to write a scholarly paper. They must learn to read critically, summarize what they have read, identify an issue, problem, flaw, or new development that challenges what they have read. They must then construct an argument, back it with evidence (and understand what constitutes acceptable evidence), identify and address counter-arguments, and reach a conclusion. Along the way they should learn how to locate appropriate source materials, assemble a bibliography, and properly cite their sources. As an instructor, you must show them the way.

Students will benefit from having the task of writing a term paper broken into smaller components or assignments. Have students start with researching a topic and creating a bibliography. Librarians are often available to come to your class to instruct students in the art of finding sources and citing them correctly. Next, assign students to producing a summary of the materials they’ve read and identifying the issue they will tackle in their paper. Have them outline their argument. Ask for a draft. Considering using peer review for some of these steps to distribute the burden of commenting and grading. Evaluating other’s work will improve their own. [See the May 29, 2015 Innovative Instructor post Using the Critique Method for Peer Assessment.] And the opportunity exists to have students meet with you in office hours to discuss some of these assignments so that you may provide direct guidance and mentoring. Their writing skills will not develop in a vacuum.

Your guidance is critical to their success. This starts with clear directions for each assignment. For an essay you will be writing a prompt that should specify the topic choices, genre, length, formal requirements (whether outside sources should be used, your expectations on thesis and argument, etc.), and formatting, including margins, font size, spacing, titling, and student identification. Directions for research papers, fiction pieces, technical reports, and other writing assignments should include the elements that you expect to find in student submissions. Do not assume students know what to include or how to format their work.

As part of the direction you give, consider sharing with your students the rubric by which you will evaluate their work. See the June 26, 2014 Innovative Instructor post Sharing Assignment Rubrics with Your Students for more detail. Not sure how to create a rubric? See previous posts: from October 8, 2012 Using a Rubric for Grading Assignments, November 21, 2014 Creating Rubrics (by Louise Pasternak), and June 14, 2017 Quick Tips: Tools for Creating Rubrics. Rubrics will save you time grading, ensure that your grading is equitable, and provide you with a tangible defense against students complaining about their grades.

Giving feedback on writing assignments can be time consuming so focus on what is most important. This means, for example, noting spelling and grammar errors but not fixing them. That should be the student’s job. For a short assignment, writing a few comments in the margins and on the last page may be doable, but for a longer paper consider typing up your comments on a separate page. Remember to start with something positive, then offer a constructive critique.

As well, bring writing into your class in concrete ways. For example, at the beginning of class, have students write for three to five minutes on the topic to be discussed that day, drawing from the assigned readings. Discuss the assigned readings in terms of the authors’ writing skills. Make students’ writing the subject of class activities through peer review. Incorporate contributions to a class blog as part of the course work. Remember, good writing is a result of practice.

Finally, there are some great resources out there to help you help your students improve their writing. Purdue University’s Online Writing Lab—OWL—website is all encompassing with sections for instructors (K-12 and Higher Ed) and students. For a quick start go to the section Non-Purdue College Level Instructors and Students. The University of Michigan Center for Research on Learning and Teaching offers a page on Evaluating Student Writing that includes Designing Rubrics and Grading Standards, Rubric Examples, Written Comments on Student Writing, and tips on managing your time grading writing.

Macie Hall, Senior Instructional Designer
Center for Educational Resources

Image source: Photo by: Matthew Henry. CC License via Burst.com.


Quick Tips: Tools for Creating Rubrics

The Innovative Instructor has previously shared posts on the value of using rubrics (Creating Rubrics, Louise Pasternak, November 21, 2014 and Sharing Assignment Rubrics with Your Students, Macie Hall June 26, 2014). Today’s Quick Tips post offers some tools and resources for creating rubrics.

Red sharpie-type marker reading "Rubrics Guiding Graders: Good Point" with an A+ marked below

Red Rubric Marker

If you are an instructor at Johns Hopkins or another institution that uses the Blackboard learning management system or Turnitin plagiarism detection, check out these platforms for their built-in rubric creation applications. Blackboard has an online tutorial here. Turnitin offers a user guide here.

If neither of these options are available to you, there is a free, online application called Rubistar that offers templates for rubric design based on various disciplines, projects, and assignments. If none of the templates fit your need, you can create a rubric from scratch. You must register to use Rubistar. A tutorial is available to get you started. And you can save a printable rubric at the end of the process.

Wondering how others in your field have designed rubrics for specific assignments or projects? Google for a model: e.g., “history paper rubric college,” “science poster rubric college,” “video project rubric college” will yield examples to get your started. Adding the word “college” to the search will ensure that you are seeing rubrics geared to an appropriate level.

With free, easy to use tools and plentiful examples to work from, there is no excuse for not using rubrics for your course assignments.

Macie Hall, Senior Instructional Designer
Center for Educational Resources

Image source © 2014 Reid Sczerba


Quick Tips: Guidelines for Inquiry-Based Project Work

Following last week’s post on definitions of inquiry-based learning, problem-based learning, case-based learning, and experiential learning, a colleague pointed me to a post from the Tomorrow’s Professor Mailing List that provides a rubric for team-based, inquiry-based work. The guidelines are taken from the book Teaching in Blended Learning Environments: Creating and Sustaining Communities of Inquiry by Norman D. Vaughan, Martha Cleveland-Innes, and D. Randy Garrison. [2013, Athabasca University Press]. A free PDF of the book is available.

Three students engaging in field work, taking soil measurements in agricultural setting.The display of the table with the rubric on the Tomorrow’s Professor site is difficult to read; a better version can be found here at the University of Regina’s Teaching Resources website.

The rubric covers eight dimensions to consider in inquiry-based project work: authenticity, academic rigor, assessment, beyond the school, use of digital technologies, connecting with experts, and elaborated communication. It provides a sound starting place for guiding your implementation of inquiry-based learning.

*******************************************************************************************

Macie Hall, Senior Instructional Designer
Center for Educational Resources

Image Source: Pixabay

Creating Rubrics

Red sharpie-type marker reading "Rubrics Guiding Graders: Good Point" with an A+ marked below

Red Rubric Marker

Instructors have many tasks to perform during the semester. Among those is grading, which can be subjective and unstructured. Time spent constructing grading rubrics while developing assignments benefits all parties involved with the course: students, teaching assistants and instructors alike. Sometimes referred to as a grading schema or matrix, a rubric is a tool for assessing student knowledge and providing constructive feedback. Rubrics are comprised of a list of skills or qualities students must demonstrate in completing an assignment, each with a rating criterion for evaluating the student’s performance. Rubrics bring clarity and consistency to the grading process and make grading more efficient.

Rubrics can be established for a variety of assignments such as essays, papers, lab observations, science posters, presentations, etc. Regardless of the discipline, every assignment contains elements that address an important skill or quality. The rubric helps bring focus to those elements and serves as a guide for consistent grading that can be used from year to year.

Whether used in a large survey course or a small upper-level seminar, rubrics benefit both students and instructors. The most obvious benefit is the production of a structured, consistent guideline for assigning grades. With clearly established criteria, there is less concern about subjective evaluation. Once created, a rubric can be used every time to normalize grading across sections or semesters. When the rubric for an assignment is shared with teaching assistants, it provides guidance on how to translate the instructor’s expectations for evaluating student submissions consistently. The rubric makes it easier for teaching assistants to give constructive feedback to students. In addition, the instructor can supply pre-constructed comments for uniformity in grading.

Some instructors supply copies of the grading rubric to their students so they can use it as a guide for completing their assignments. This can also reduce grade disputes. When discussing grades with students, a rubric acts as a reminder of important aspects of the assignment and how each are evaluated.

Below are basic elements of rubrics, with two types to consider.

I. Anatomy of a rubric

All rubrics have three elements: the objective, its criteria, and the evaluation scores.

Learning Objective
Before creating a rubric, it is important to determine learning objectives for the assignment. What you expect your students to learn will be the foundation for the criteria you establish for assessing their performance. As you are considering the criteria or writing the assignment, you may revise the learning objectives or adjust the significance of the objective within the assignment. This iteration can help you hone in on what is the most important aspect of the assignment, choose the appropriate criteria, and determine how to weigh the scoring.

Criteria
When writing the criteria (i.e., evaluation descriptors), start by describing the highest exemplary result for the objective, the lowest that is still acceptable for credit, and what would be considered unacceptable. You can express variations between the highest and the lowest if desired. Be concise by using explicit verbs that relate directly to the quality or skill that demonstrates student competency. There are lists of verbs associated with cognitive categories found in Bloom’s taxonomy (Knowledge, Comprehension, Application, Evaluation, Analysis, and Synthesis). These lists express the qualities and skills required to achieve knowledge, comprehension or critical thinking (Google “verbs for Bloom’s Taxonomy”).

Evaluation Score
The evaluation score for the criterion can use any schema as long as it is clear how it equates to a total grade. Keep in mind that the scores for objectives can be weighted differently so that you can emphasize the skills and qualities that have the most significance to the learning objectives.

II. Types of rubrics

There are two main types of rubrics: holistic (simplistic) and analytical (detailed).

Selecting your rubric type depends on how multi-faceted the tasks are and whether or not the skill requires a high degree of proficiency on the part of the student.

Holistic rubric
A holistic rubric contains broad objectives and lists evaluation scores, each with an overall criterion summary that encompasses multiple skills or qualities of the objective. This approach is more simplistic and relies on generalizations when writing the criteria.

The criterion descriptions can list the skills or qualities as separate bullets to make it easier for a grader to see what makes up an evaluation score. Below is an example of a holistic rubric for a simple writing assignment.

Table showing an example of a holistic rubric

Analytical rubric
An analytical rubric provides a list of detailed learning objectives, each with its own rating scheme that corresponds to a specific skill or quality to be evaluated using the criterion. Analytical rubrics provide scoring for individual aspects of a learning objective, but they usually require more time to create. When using analytical rubrics, it may be necessary to consider weighing the score using a different scoring scale or score multipliers for the learning objectives. Below is an example of an analytical rubric for a chemistry lab that uses multipliers.

Table showing an example of an analytical rubric

It is beneficial to view rubrics for similar courses to get an idea how others evaluate their course work. A keyword search for “grading rubrics” in a web search engine like Google will return many useful examples. Both Blackboard and Turnitin have tools for creating grading rubrics for a variety of course assignments.

Louise Pasternack
Teaching Professor, Chemistry, JHU

Louise Pasternack earned a Ph.D. in chemistry from Johns Hopkins. Prior to returning to JHU as a senior lecturer, Louise Pasternack was a research scientist at the Naval Research Laboratory. She has been teaching introductory chemistry laboratory at JHU since 2001 and has taught more than 7000 students with the help of more than 250 teaching assistants. She became a teaching professor at Hopkins in 2013.

Image sources: © 2014 Reid Sczerba

Sharing Assignment Rubrics with Your Students

We’ve written about rubrics before, but it is certainly a topic that bears additional clip art image of an Instructor grading using a rubriccoverage. In its broadest meaning, a rubric is a guide for evaluation. More specifically, rubrics establish the criteria, qualitative markers, and associated scores for assessment of student work. Recently I have been talking and thinking about rubrics in a number of contexts – in consultations with faculty, as a workshop facilitator, and in planning for a hands-on exercise for an instruction module.

In consultation with faculty on assessing assignments I sometimes hear, “I’ve been teaching this course for years. It’s a small seminar so I assign a term paper. I don’t need a rubric because I know what qualifies as an “A” paper.” What that means is that the person has a rubric of sorts in his or her head. The problem is that the students aren’t mind readers. As useful as rubrics are for an instructor to insure that grading is consistent across the class, they are equally useful when shared with students, who then can understand the criteria, qualitative markers, and associated scores for the assignment.

As a workshop facilitator I recently saw the advantage for students in having a rubric to guide them in preparing a final project. Beyond the instructions for the assignment, they could see clearly the points on which their work would be evaluated and what would constitute excellent, good, and unacceptable work. Unsure about how to create rubrics to share with your students? There are some great resources to help you develop rubrics for your classes.

The University of California at Berkeley Center for Teaching and Learning webpage on rubrics offers general information on using rubrics and on how to create a rubric. The CTL notes that “[r]ubrics help students focus their efforts on completing assignments in line with clearly set expectations.” There are also examples rubrics for downloading and bibliography for further reading.

The Eberly Center for Teaching Excellence & Educational Innovation at Carnegie Mellon University has a section on rubrics as part of their resources on designing and teaching a course (also worth a look).  Their advice on sharing rubrics with students: “A rubric can help instructors communicate to students the specific requirements and acceptable performance standards of an assignment. When rubrics are given to students with the assignment description, they can help students monitor and assess their progress as they work toward clearly indicated goals. When assignments are scored and returned with the rubric, students can more easily recognize the strengths and weaknesses of their work and direct their efforts accordingly.” There are also examples of rubrics for paper assignments (Philosophy, Psychology, Anthropology, History); projects (including an Engineering Design project); oral presentations (including group presentations); and for assessing student in-class participation.

The Cornell University Center for Teaching Excellence section on rubrics states that “[r]ubrics are a powerful tool for supporting learning by guiding learners activities and increasing their understanding of their own learning process.” They provide a template for creating a rubric – a rubric for rubrics, so to speak. There are a number of sample rubrics and scoring feedback sheets, sources for sample rubrics, and links to presentations on using rubrics.

All three of these sites gave me useful examples and resources for developing a rubric to use in the instructional module I’ll teach in August.

Macie Hall, Senior Instructional Designer
Center for Educational Resources

Image source: Microsoft Clip Art, edited by Macie Hall

Multimedia Assignments

In the previous post, we looked at a debate on the value of a certain type of student writing assignments. The upshot was that it might be in the best interests of students for instructors to model real-life research experiences and allow for presentation of research results in the range of media possibilities available to working professionals. Creating multimedia assignments for your students may have appeal, but for instructors taking the plunge for the first time, such assignments may seem daunting. You may be equating multimedia with video, and video with movie production, and imagining that students will somehow need to become budding Quentin Tarantinos in addition to learning all the course materials. And where is that video equipment going to come from?

Image showing icon-style examples of text, audio, still images, animation, video and interactivity.In truth, multimedia creation can output to a wide range of formats, including digital posters, audio-casts, timelines, visualizations, digital/online exhibitions, websites, blogs, presentation software productions, and video. Video can be produced using easy to learn and readily available applications. PowerPoint and Keynote offer low-tech solutions as there are options to save presentations as video files. Student don’t need a video camera for these – still images combined with timed transitions, animations, and music or voice-over recordings can make for very effective end products. For true video, many students have smartphones that are capable of shooting video clips for editing in iMovie, or Windows Movie Maker, or even on the phone itself.

Unless your goal is for students to learn advanced digital video skills, the slickness of the end product should not be the sole determinant of the grade. Rather, just as you would grade a text assignment, your assessment rubric should focus on the strength of the argument and supporting evidence. But, your first question should be whether a multimedia assignment is in alignment with your teaching objectives.

Mike Heller, Departmental Teaching Fellow (Music) at Harvard’s Derek Bok Center for Teaching and Learning, has created a two minute video on the five key considerations for designing multimedia assignments. These are:

1. Why create a multimedia assignment? What is the value added?

2. Be aware of the myth of the digital native. Not all students are technical wizards. Their experience and expertise will vary. It’s a good idea to start with lower stakes assignments to get students familiar with multimedia technologies before introducing a major project.

3. Don’t just teach the tools, teach the critical thinking. Try folding a traditional assignment into the multimedia project, perhaps by having students write an essay before adapting it into a video presentation.

4. Set clear goals by creating a concrete rubric. Without this you may find it difficult to assign grades once you receive the work.  Having a clear vision of your primary learning objectives will make it much easier when it comes to grading and providing feedback.

5. Communicate your teaching goals to your students. Distributing your rubric when you make the assignment is a good way to achieve this. By offering specific guidelines about the skills you want them to learn you insure that students are clear about the assignment.

In regards to the third point on teaching critical thinking as well as the tools, you may not have the expertise to teach some of the multimedia tools and that may determine the path you take in deciding how to frame the assignment. Look for resources on your campus.

Here at Johns Hopkins Homewood campus, we have the Digital Media Center  providing student support. See the end of the post for suggestions and links to specific free online platforms to support multimedia assignments.

Another tip sheet for creating multimedia assignments can be found at the University of Massachusetts at Amherst Office of Instructional Technology – 10 Tips for Successful Multimedia Assignments.

University of Wisconsin-Eau Claire Technology to Enhance Learning Experience module – Five Steps to Creating Successful Multimedia Assignments – suggests that instructors “…[c]omplete the technology-based assignment yourself before assigning it to students. This will give you the most accurate idea of the amount of time and training involved, and the challenges that students may encounter. This will also enable you to develop a rubric for grading and communicating your expectations to students”

If the final products are going to be shared on public websites or otherwise publicly accessible, you will want to think about copyright issues. This can be a good opportunity to teach your students about copyright and fair use. Depending on your institution, there may be library staff able to provide assistance or other resources available, perhaps through the college or university office of legal counsel. We have a great LibGuide entitled Copyright and Fair Use: Trends and Resources for 21st Century Scholars here at JHU to get you started. 

Suggested Resources

Blogs – Blogger, Tumblr, WordPress
Timelines – Timeline JS, SIMILE  Timeline
Digital/Online Exhibitions – Padlet, Omeka, Google Sites, WordPress, Tumblr
Websites – Google Sites, WordPress

Macie Hall, Senior Instructional Designer
Center for Educational Resources


Image Source: CC Kevin Jarret – http://www.flickr.com/photos/kjarrett/2856162498/in/photostream/ http://en.wikipedia.org/wiki/Multimedia

A Tip of the Hat to Tomorrow’s Professor

For writing The Innovative Instructor blog posts I read a lot of books and articles related to teaching and follow various educational blogs.  One resource that I’d like to pass along is the Tomorrow’s Professor e-Newletter. Sponsored by the Stanford University Center for Teaching and Learning, Tomorrow’s Professor is edited by Richard M. Reis, Ph.D., a consulting professor in the Department of Mechanical Engineering at Stanford.

Screen shot of Tomorrow's Professor website logo.Twice a week (Mondays and Thursdays) during the academic year Reis passes along articles from journals or excerpts from books on a wide range of topics in the following categories:

  • Tomorrow’s Teaching and Learning
  • Tomorrow’s Academy
  • Tomorrow’s Graduate Students and Postdocs
  • Tomorrow’s Academic Careers
  • Tomorrow’s Research

“Tomorrows Professor seeks to foster a diverse, world-wide teaching and learning ecology among its over 49,000 subscribers at over 800 institutions and organizations in over 100 countries around the world.”

The more than 1250 posts to date have been archived so you can search for past posts as well as subscribe to receive new postings via email.

As an introduction, I found a recent post on The Three Most Time-Efficient Teaching Practices [#1218] to reflect some of the pedagogical best practices that The Innovative Instructor tries to promote.  The author, Linda C. Hodges, Associate Vice Provost for Faculty Affairs and Director of the Faculty Development Center,University of Maryland, Baltimore County, states:

What constitutes productivity in teaching is a point of debate, of course, but many of us agree that we want to facilitate student learning. When faculty are challenged to change traditional teaching practices to promote better student success, all we may see looming before us is additional class preparation time. The best kept secret, however, is how much more time-efficient some of these touted teaching practices are.

The three practices she describes are 1) beginning planning with the end in mind by using backward course design, 2) generating criteria or rubrics to describe disciplinary work for students, and 3) embedding “assessment” into assessments.

Hodges asserts that spending time in the planning and development of your courses using proven pedagogical methods will save you time in your teaching in the long run. Taking a few minutes each week to peruse Tomorrow’s Professor could help you in all aspects of your academic life.

Macie Hall, Senior Instructional Designer
Center for Educational Resources


Image Source: Screenshot of Tomorrow’s Professor logo
http://cgi.stanford.edu/~dept-ctl/cgi-bin/tomprof/postings.php