The New Google Sites

We’re always on the lookout for applications that instructors and their students can use to enhance course work. A previous post We Have a Solution for That: Student Presentations, Posters, and Websites (October 6, 2017) mentioned a new version of Google Sites as having potential as a presentation software that allows for easy collaboration among student team members. Today’s post will delve deeper into its possibilities and use. This post is also available in PDF format as part of The Innovative Instructor articles series.

Logo for Google SitesNew Google Sites is an online website creation platform. It doesn’t require web development or design experience to create sites that work well on mobile devices. The New Google Sites application is included with the creation tools offered in Google Drive, making it easier to share and integrate your Google Drive content.

In 2006 Google purchased JotSpot, a software company that had been creating social software for businesses. The software acquired from that purchase was used to create the first iteration of Google Sites, now known as Classic Google Sites. Ten years later, Google launched a completely rebuilt Google Sites, which is currently being referred to as New Google Sites.

New Google Sites hasn’t replaced Classic Google Sites so much as it offers a new and different experience. The focus of New Google Sites is to increase collaboration for all team members regardless of their web development experience. It is also integrated with Google Drive so that teams working within the Google apps environment can easily associate shared content.

This new iteration of Google Sites is designed with mobile devices in mind. Users are

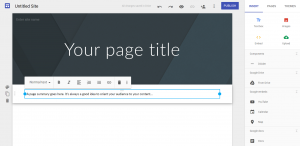
Screenshot example of the New Google Sites editing interface.

Example of the New Google Sites editing interface.

not able to add special APIs (Application Programmable Interface, which extends functionality of an application) or edit HTML directly. This keeps the editing interface

and options simple to ensure that whatever you create will work consistently across all browsers and devices. While this may seem limiting, you still have the option to use Classic Google Sites if you want a higher level of control.

In a classroom setting, instructors are often cautious about assigning students projects that require them to learn new technical skills that aren’t directly relevant to the course content. Instructors must balance the time it will take students to achieve technical competency against the need to ensure that students achieve the course learning goals. With New Google Sites, students can focus on their content without being overwhelmed by the technology.

In addition to ease of use, collaborative features allow students to work in teams and share content. Group assignments can offer students a valuable learning experience by providing opportunities for inclusivity, exposure to diverse viewpoints, accountability through team roles, and improved project outcomes.

New Google Sites makes it easy for the causal user to disseminate new ideas, original research, and self-expression to a public audience. If the website isn’t ready to be open to the world, the site’s editor has the ability to keep it unpublished while still having the option to collaborate or share it with select people. This is an important feature as student work may not be ready for a public audience or there may be intellectual property rights issues that preclude public display.

Professors at here at Johns Hopkins have used New Google Sites for assignments. In the History of Science and Technology course, Man vs. Machine: Resistance to New Technology since the Industrial Revolution, Assistant Professor Joris Mercelis had students use New Google Sites for their final projects. Teams of two or three students were each asked to create a website to display an illustrated essay based on research they had conducted. Images and video were required to support their narrative arguments. Students had to provide proper citations for all materials. Mercelis wanted the students to focus on writing for a lay audience, an exercise that encouraged them to think broadly about the topics they were studying.

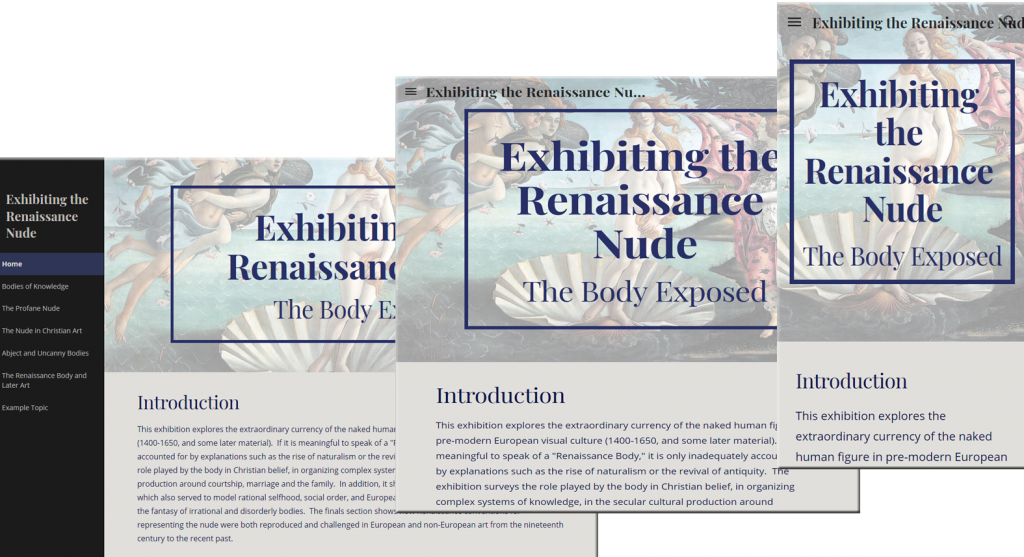
History of Art Professor Stephen Campbell used a single Google Site where student teams collaborated to produce an online exhibition, Exhibiting the Renaissance Nude: The Body Exposed. Each student group was responsible for supplying the materials for one of five topic pages. The content developed from this project was accessible only to the class.

In both cases, students reported needing very little assistance when editing their sites. Typically, giving an introductory demonstration and providing resources for where to find help are all students need to begin working.

Recently, Google has created the ability to allow other Google Drive content to be embedded in a site. This means that you can embed a form or a document on a web page to elicit responses/feedback from your audience without them having to leave the site. This level of integration further supports the collaborative nature of Google applications.

Currently, this iteration of Google Sites uses the New in its title. There may come a time when Google will drop the New or re-brand New Google Sites with a different name. There is no indication that Google will stop supporting Classic Google Sites with its more advanced features.

Use of both versions of Google Sites is free and accessible using your Google Account. You can create a new site by signing into Google and going to the New Google Sites page (link provided below). You can also create a site from Google Drive’s “New” button in the creation tools menu.

It is recommended that students create a new account for class work instead of us­ing their personal accounts. While this is an additional step, it ensures that they can keep their personal lives separated from their studies.

A Google Site as displayed on a desktop, tablet, and smartphone.

A Google Site as displayed on a desktop, tablet, and smartphone.

Additional Resources:

Reid Sczerba, Multimedia Developer
Center for Educational Resources

Image sources: Google Sites logo, screenshots

Resources for Multimedia Creation

I’ve been compiling a list of resources for creating multimedia for faculty to use either for teaching or in thinking about tools students could use for course assignments or projects. Many of these have how-to videos on the application websites making getting started an easy task. Most have a free-to-use option, although premium features may be fee-based. You might want to check a previous Innovative Instructor post on Multimedia Assignments. If you have a favorite application for multimedia making, please share with us in the comments.

Image showing icon-style examples of text, audio, still images, animation, video and interactivity.Animations

Powtoon: Free software for creating animated videos and presentations. [http://www.powtoon.com/]

Pixton: Online comic creator. [http://www.pixton.com/]

Audio

Audacity: Audacity is a free, open source, cross-platform software for recording and editing sounds. Audacity is available for Windows, Mac, GNU/Linux, and other operating systems. [http://audacity.sourceforge.net/]

Blogs, Websites, Wikis

Blogger: Google’s blogging application. Users can select templates and customize them, or create their own templates using CSS. [https://www.blogger.com]

Google Sites: Sites is Google’s wiki- and website-creation tool. Facilitates collaboration and team-based site creation. [https://sites.google.com/]

Tumblr: Tumblr is both a blogging and a social media application. A dashboard interface makes creating multimedia-rich blog posts easy. [https://www.tumblr.com/]

WordPress: WordPress is a free and open source blogging and website creation application. You can host your own WordPress instance or use their free hosting service.  Upgrades are available. Easy to use with hundreds of themes to choose from. [https://wordpress.com/]

Collections/Exhibitions

Omeka: Omeka is a free, flexible, and open source web-publishing platform for the display of library, museum, archives, and scholarly collections and exhibitions. [http://omeka.org/ to download for self-hosting and http://www.omeka.net/ for online hosting options]

Padlet: A web-based application that gives you a “wall” (think of it as a multimedia bulletin board) that you can drag and drop content onto in service of any number of pedagogical objectives including exhibits, timelines, and posters. [http://padlet.com/]

Pinterest: This social media tool can be used for pedagogical good. Think of it as a series of bulletin boards on which you or your students can assemble and share ideas for projects or create virtual collections and exhibits. [http://www.pinterest.com/]

Mapping

Google Maps: With Google Maps Application Programming Interface (API) users can expand, customize, and embed maps and mapping tools into their websites. This includes combining Flickr (the photo sharing website) content with maps. These work well with Google Sites and Google Docs. [https://developers.google.com/maps/]

Online Posters

Glogster: Originally a social network for teenagers that allowed users to create (for free) interactive posters called glogs, Glogster has now expanded to a full online learning platform providing educational content and tools for creation at different price points. There is still a free version for educators that allows for adding up to 10 students. You can mix text, audio, video, images, graphics and more to create professional-looking posters. [http://edu.glogster.com/]

Padlet: A web-based application that gives you a “wall” (think of it as a multimedia bulletin board) that you can drag and drop content onto in service of any number of pedagogical objectives including exhibits, timelines, and posters. [http://padlet.com/]

Presentations

Prezi: Prezi is a cloud-based presentation software tool. A zooming interface allows users to move in and out from one concept to another. Good for both linear and non-linear presentations. [http://prezi.com/]

Screen Capture Recording

Screencast-o-matic: Free one-click screen capture recording on Windows or Mac computers with no installation. http://www.screencast-o-matic.com/

Timelines

Padlet: A web-based application that gives you a “wall” (think of it as a multimedia bulletin board) that you can drag and drop content onto in service of any number of pedagogical objectives including exhibits, timelines, and posters. [http://padlet.com/]

Timeline JS: TimelineJS is an open-source tool that enables you to build visually-rich interactive timelines. [http://timeline.knightlab.com/]

Video

Freemake Video Converter: Free application that converts video to AVI, MP4, WMV, MKV, FLV, 3GP, MPEG, DVD, Blu-ray, MP3, iPod, iPhone, iPad, PSP, Android, Nokia, Samsung, BlackBerry. [http://www.freemake.com/]

Freemake Video Downloader: Download video free from YouTube, Facebook, Vimeo, 10,000+ video sites. [http://www.freemake.com/]

iMovie: iMovie is a proprietary video editing software application sold by Apple Inc. for the Mac and iOS devices. Users can create movies by editing photos and video clips, adding titles, music, and effects, including basic color correction and video enhancement tools and transitions such as fades and slides. [https://www.apple.com/mac/imovie/]

PowerPoint: PowerPoint features such as timed animations and transitions, voice-over recording, audio and video insertion, and the ability to save a presentation in a video file format make it a platform for easy video creation. Check YouTube for how-to videos.

WeVideo: WeVideo is an online video creation platform for video editing, collaboration, and sharing across any device. It is easy to use, cross-platform, cloud hosted, with sophisticated editing and enhancement tools. There is a free version and upgrades are inexpensive. [https://www.wevideo.com/]

Windows Movie Maker: A free video editing application from Microsoft, Windows Movie Maker offers the ability to create, edit and publish videos. Users can combine still images and video clips, sound tracks and voice recordings with themes and special effects to create movies. [http://windows.microsoft.com/en-us/windows-live/movie-maker]

Video Annotation

Zaption: Students, teachers, and trainers use Zaption to create high-quality, engaging video lessons. Add images, text, and questions to any online video, creating interactive lessons that meet your students’ needs. [https://www.zaption.com/]

Visualizations

Silk: Silk is an online data visualization application. Each Silk contains data on a specific topic. The visualizations are interactive. You can upload a spreadsheet or create one on the site. A number of options, including charts, graphs, maps, and other data displays are available. [https://www.silk.co]


Macie Hall, Senior Instructional Designer
Center for Educational Resources

Image Source: CC Kevin Jarret –http://www.flickr.com/photos/kjarrett/2856162498/in/photostream/http://en.wikipedia.org/wiki/Multimedia

Multimedia Assignments

In the previous post, we looked at a debate on the value of a certain type of student writing assignments. The upshot was that it might be in the best interests of students for instructors to model real-life research experiences and allow for presentation of research results in the range of media possibilities available to working professionals. Creating multimedia assignments for your students may have appeal, but for instructors taking the plunge for the first time, such assignments may seem daunting. You may be equating multimedia with video, and video with movie production, and imagining that students will somehow need to become budding Quentin Tarantinos in addition to learning all the course materials. And where is that video equipment going to come from?

Image showing icon-style examples of text, audio, still images, animation, video and interactivity.In truth, multimedia creation can output to a wide range of formats, including digital posters, audio-casts, timelines, visualizations, digital/online exhibitions, websites, blogs, presentation software productions, and video. Video can be produced using easy to learn and readily available applications. PowerPoint and Keynote offer low-tech solutions as there are options to save presentations as video files. Student don’t need a video camera for these – still images combined with timed transitions, animations, and music or voice-over recordings can make for very effective end products. For true video, many students have smartphones that are capable of shooting video clips for editing in iMovie, or Windows Movie Maker, or even on the phone itself.

Unless your goal is for students to learn advanced digital video skills, the slickness of the end product should not be the sole determinant of the grade. Rather, just as you would grade a text assignment, your assessment rubric should focus on the strength of the argument and supporting evidence. But, your first question should be whether a multimedia assignment is in alignment with your teaching objectives.

Mike Heller, Departmental Teaching Fellow (Music) at Harvard’s Derek Bok Center for Teaching and Learning, has created a two minute video on the five key considerations for designing multimedia assignments. These are:

1. Why create a multimedia assignment? What is the value added?

2. Be aware of the myth of the digital native. Not all students are technical wizards. Their experience and expertise will vary. It’s a good idea to start with lower stakes assignments to get students familiar with multimedia technologies before introducing a major project.

3. Don’t just teach the tools, teach the critical thinking. Try folding a traditional assignment into the multimedia project, perhaps by having students write an essay before adapting it into a video presentation.

4. Set clear goals by creating a concrete rubric. Without this you may find it difficult to assign grades once you receive the work.  Having a clear vision of your primary learning objectives will make it much easier when it comes to grading and providing feedback.

5. Communicate your teaching goals to your students. Distributing your rubric when you make the assignment is a good way to achieve this. By offering specific guidelines about the skills you want them to learn you insure that students are clear about the assignment.

In regards to the third point on teaching critical thinking as well as the tools, you may not have the expertise to teach some of the multimedia tools and that may determine the path you take in deciding how to frame the assignment. Look for resources on your campus.

Here at Johns Hopkins Homewood campus, we have the Digital Media Center  providing student support. See the end of the post for suggestions and links to specific free online platforms to support multimedia assignments.

Another tip sheet for creating multimedia assignments can be found at the University of Massachusetts at Amherst Office of Instructional Technology – 10 Tips for Successful Multimedia Assignments.

University of Wisconsin-Eau Claire Technology to Enhance Learning Experience module – Five Steps to Creating Successful Multimedia Assignments – suggests that instructors “…[c]omplete the technology-based assignment yourself before assigning it to students. This will give you the most accurate idea of the amount of time and training involved, and the challenges that students may encounter. This will also enable you to develop a rubric for grading and communicating your expectations to students”

If the final products are going to be shared on public websites or otherwise publicly accessible, you will want to think about copyright issues. This can be a good opportunity to teach your students about copyright and fair use. Depending on your institution, there may be library staff able to provide assistance or other resources available, perhaps through the college or university office of legal counsel. We have a great LibGuide entitled Copyright and Fair Use: Trends and Resources for 21st Century Scholars here at JHU to get you started. 

Suggested Resources

Blogs – Blogger, Tumblr, WordPress
Timelines – Timeline JS, SIMILE  Timeline
Digital/Online Exhibitions – Padlet, Omeka, Google Sites, WordPress, Tumblr
Websites – Google Sites, WordPress

Macie Hall, Senior Instructional Designer
Center for Educational Resources


Image Source: CC Kevin Jarret – http://www.flickr.com/photos/kjarrett/2856162498/in/photostream/ http://en.wikipedia.org/wiki/Multimedia